Loud fan noise in your F-150 may be normal, especially at high ambient temperatures, but it can signal issues like improperly charged AC, low coolant, a faulty pressure switch, a stuck fan relay, thermostat problems, or a bad Evap temperature sensor.
This problem can be fixed by recharging the refrigerant, topping up the coolant, replacing the AC pressure switch, changing the thermostat to a 160-degree one, or dealing with the Evap sensor.
To see which fans are causing the issue in your F150 and why, continue reading my article.
Why Is Your F150 Fan Making Loud Noise?
Here’s why your truck’s fan is making such a racket:
1. Normal Operation
In an F-150, the cooling fans can get pretty loud, especially at high speed, sounding like the older clutch fans.
Ford tweaked things (SSM 45791) to make them work more at higher speeds when it’s hot, improving your AC.
So, if you hear them roaring on a scorching day, it’s just your truck cooling the AC and making sure you get some cold air.
Only worry if the noise becomes too obvious outside your car, is suddenly louder than it used to be, or if others start commenting on it.
2. Improperly Charged AC
When AC is charged using pressure gauges instead of the proper refrigerant weight, it messes with cooling.
The increased air resistance is why the radiator fan runs fast – as it has to work harder, and that ends up making jet-like noises that even cover up noises outside the truck.
More often than not, you won’t even be able to converse outside the car, even if the door and windows are closed.
3. Low Coolant Level
If there’s not enough coolant in the engine cooling system, it messes up heat dissipation, making the radiator fan put in extra effort.
As the fan speeds up, dealing with more air resistance, it starts making loud sounds.
Low coolant levels usually happen because of leaks, not-so-great maintenance, or evaporation, messing with the cooling system’s effectiveness.
This is one of the common causes of loud fan noises in most modern Ford models, especially the 2005-2021 F150s.
4. Faulty Pressure Switch
A faulty pressure switch in the AC system messes with the compressor and makes it work incorrectly.
The cooling fan has to handle a bigger workload because of that, resulting in loud fan noises.
Pressure switch problems can happen because of electrical issues, sensor glitches, or just wear and tear.
5. Stuck Fan Relay
When the fan relay gets stuck, the radiator fan keeps running non-stop, causing extra wear on the motor and blades resulting in loud humming noises.
Fan relay issues can come from electrical problems, corrosion, or manufacturing slip-ups. The last one can happen pretty often with Ford trucks, but even more so with F150 EcoBoosts.
6. Thermostat Issue
The regular thermostat in an F150 usually opens up at a certain temperature to keep the engine coolant in check. If this temperature limit is too high, the engine of your F150 overheats.
This makes the auxiliary fan kick in more often and goes full blast to cool things down.
The constant loud fan action happens because the regular thermostat lets the engine heat up too much, making the auxiliary fan work extra hard.
7. Bad EVAP Temperature Sensor
Some 2015-2020 F-150, 2017-2020 Super Duty, and 2018-2020 Expedition/Navigator models might have non-stop engine fan action because of a messed-up evaporator temperature sensor.
When this sensor starts malfunctioning, it freezes the evaporator, messing with A/C and causing high pressures that make the engine fans go crazy.
The sensor can’t read the evaporator temperature right, so the fans keep blowing so loud all the time.
How To Fix the F150 Loud Fan Noise Issue?
I’ll list all the quick fixes, as well as the more thorough ones that might help you avoid a trip to the technician!
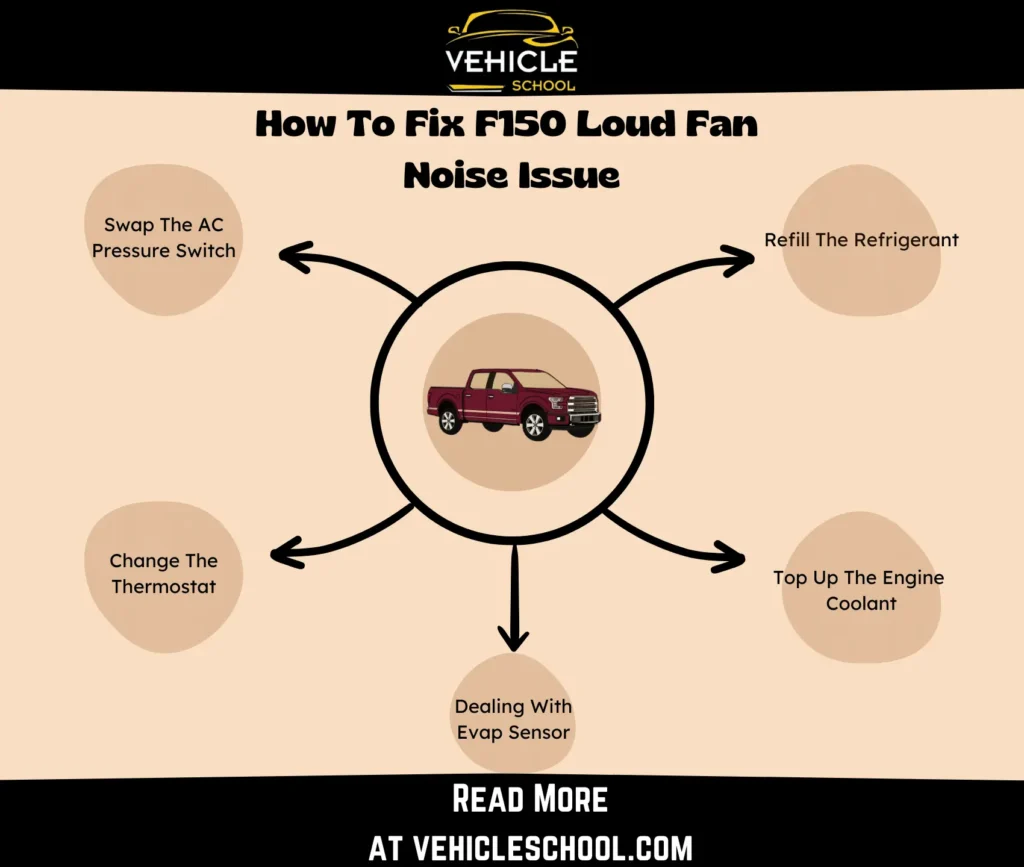
1. Refill The Refrigerant
| Note: Recharging your Ford F-150’s AC is simple and affordable. You just need to find the low-pressure charging port based on your truck’s year and engine. However, consider a professional for better service; they have the right tools, can handle system evacuation, and connect to both low and high-pressure ports. |
- Check if the AC system is almost empty by looking at low-side pressure.
- Use an adapter to connect a self-seal refrigerant can to a gauge.
- Remove air from the AC line by squeezing the trigger a bit.
- Connect the can to the gauge and watch the compressor.
- Add refrigerant slowly, checking the compressor and pressure now and then.
- Weigh the can with a kitchen scale several times for accuracy.
- Stop when the compressor runs well and the pressure is right.
- Check that the compressor and pressure stay steady.
- Disconnect the can when you’ve added the right amount.
- See if you still hear the loud noises with the AC on.
2. Top Up The Engine Coolant
- Turn off the engine, set the parking brake, and open the hood.
- Bleed the cooling system with the engine off and cabin ventilation on.
- Open the radiator and expansion tank caps and drain the coolant into a container.
- Use a tube to control drainage from the radiator’s bleed screw.
- Clean the system by rinsing it with water and closing the bleed screw.
- Fill the radiator with clean water, run the engine, and drain when cooled.
- Repeat water filling and draining until clear.
- Turn off climate control during the filling.
- Close the radiator bleed screw and fill with coolant.
- Start the engine, warm it up, alternate between acceleration and idle.
- Bleed air by squeezing coolant hoses and restarting the engine.
- Repeat acceleration and idling until the thermostat opens.
- Check for hot radiator tubes, indicating proper purging.
- Turn off the engine, and readjust coolant levels if needed.
- Monitor coolant levels for the first few miles and check for leaks.
3. Swap The AC Pressure Switch
There are patchwork fixes for taking care of a faulty pressure switch, but I advise you to avoid trying them, as they can damage the compressor.
Go for a full replacement instead, a new switch is only a few bucks.
- Locate the AC pressure switch, usually on the dryer.
- Buy the right-sized replacement pressure switch.
- Unplug the old switch.
- Use a wrench to remove the old switch.
- Install the new pressure switch.
- Plug in the new switch.
- Start the truck to engage the clutch.
- Add refrigerant if needed when connecting hoses
4. Change The Thermostat
The stock thermostat won’t do you any good if the sound is coming from your auxiliary fan. You’ll need to grab aftermarket thermostats that have a 160-degree limit.
You can try out the ones from Steeda or Mishimoto, as most F150 users use those.
However, I would only recommend this if you really can’t stand the noise, as lower temperature limits can reduce overall mileage, and you’ll need to look for other ways to improve f150 gas mileage.
Anyways, here’s how to do the swap:
- Park and let the engine cool.
- Put a pan under the radiator, drain coolant, and close the petcock.
- Open the hood, disconnect hoses, and remove the air intake tube.
- If necessary, loosen the tensioner and remove the accessory drive belt.
- Release the clamp, disconnect the lower radiator hose, and take off the thermostat housing.
- Remove the old thermostat, put on the new one with a lubricated o-ring.
- Reinstall the coolant inlet, reconnect the lower hose, and tighten the clamp.
- Rinse any coolant on pulleys, put the belt back on, and release tension.
- Put back the air cleaner tube.
- Fill the coolant, start the vehicle, warm it up, and adjust the coolant level as needed.
- Check if you still get noise.
5. Diagnose And Replace The EVAP Sensor
This one is a bit hands-on, but you can still do it fairly easily.
If you’ve got a bad Evap Sensor, you can try a diagnosis. Before you start, check the pressure. If AC pressures are high on both sides, do an evacuation/recharge.
- Run A/C on max/recirculation for 10 mins at idle, then drive.
- Use a Ford scan tool to check EVAP_TEMP PID in FCIM.
- Simultaneously, check the evaporator temp with a thermometer at the vent.
- Compare EVAP_TEMP PID to vent thermometer reading.
- If the vent thermometer is colder, go ahead and replace the evaporator assembly.
If you find that you do need a replacement, I’d suggest following the video given below. It’s a very thorough process and you’ll need to take off the dash first.
Final Thoughts
So, there you have it, the full breakdown of why your F150 might unleash a loud fan noise, turning your peaceful drive into a flight on a runway.
Following these fixes, you can cruise along without the unwanted noise, enjoying the serenity while driving.