Grinding noise in your F150 during startup may be due to timing chain tension, lash adjuster issues, or starter problems. You can fix it by replacing lash adjusters, VCT solenoids, or the starter. For EcoBoost engines, you might need to replace the cam phaser or the whole timing set.
If you want more details on how to go through with these fixes, dive into my guide!
Why Is My Ford F150 Making Grinding Noise When Starting?
Let’s figure out what’s causing this annoyance in your truck:
1. Normal Operation
It’s normal for F150s with Triton motors to briefly grind on start-up due to timing chain tensioners relying on oil pressure.
After sitting, oil goes to the pan’s bottom. When starting, it takes 1-1.5 seconds for oil to reach tensioners, causing the “grinding” noise as the chain moves on guides.
It’s not harmful and stops once pressure builds up, removing the chain slack.
2. Malfunctioning Lash Adjuster/VCT Solenoid
A faulty lash adjuster can cause noise due to poor valve clearance from wear or oil flow problems.
And a faulty VCT solenoid, often ruined from oil or electrical issues, disrupts camshaft timing adjustments during startup.
If the startup grind lasts more than 2 seconds or happens after the engine has warmed up, this might be the issue.
3. Bad Starter
Grinding noises during startup often point to a poor starter.
If your starter is old and worn, it could be trying a bit too hard to get going, causing that grinding noise.
Corroded cables also play a part by adding resistance and messing with the starter’s voltage.
4. Wrong Oil Filter
Using the wrong or bad-quality oil filter can lead to startup grinding noises.
The oil filter is important for maintaining proper oil flow and pressure in the engine.
If you use an improper or subpar filter, it might restrict oil flow, causing a momentary lack of lubrication during startup.
This, in turn, increases friction and wear on engine parts, resulting in that annoying grinding noise. Oil filters from FRAM are known to commonly cause this.
5. Broken Flywheel Teeth
A worn flexplate (aka flywheel) can lead to the same startup grinding.
The starter’s gear connects with the flexplate, which is essentially a big gear turning the crankshaft to start the engine.
As time goes on, the teeth on either the flexplate or starter can wear or break, causing a skip or grind when the starter kicks in.
This wear messes with their smooth connection, resulting in audible noise.
6. EcoBoost Cam Phasers/Timing Chain Issue
The grinding noises can happen because of problems with the cam phasers or timing chain.
This is common in 3.5L EcoBoost engines – happens often when doing a cold start.
Wear and tear on the timing chain components makes it so the camshafts and crankshafts don’t sync up properly.
This means the cam phasers, which adjust camshaft timing, might have a hard time working smoothly, causing that grinding noise.
How To Fix Grinding Noise In F150 When Starting The Truck?
Now, here’s how you can quiet things down.

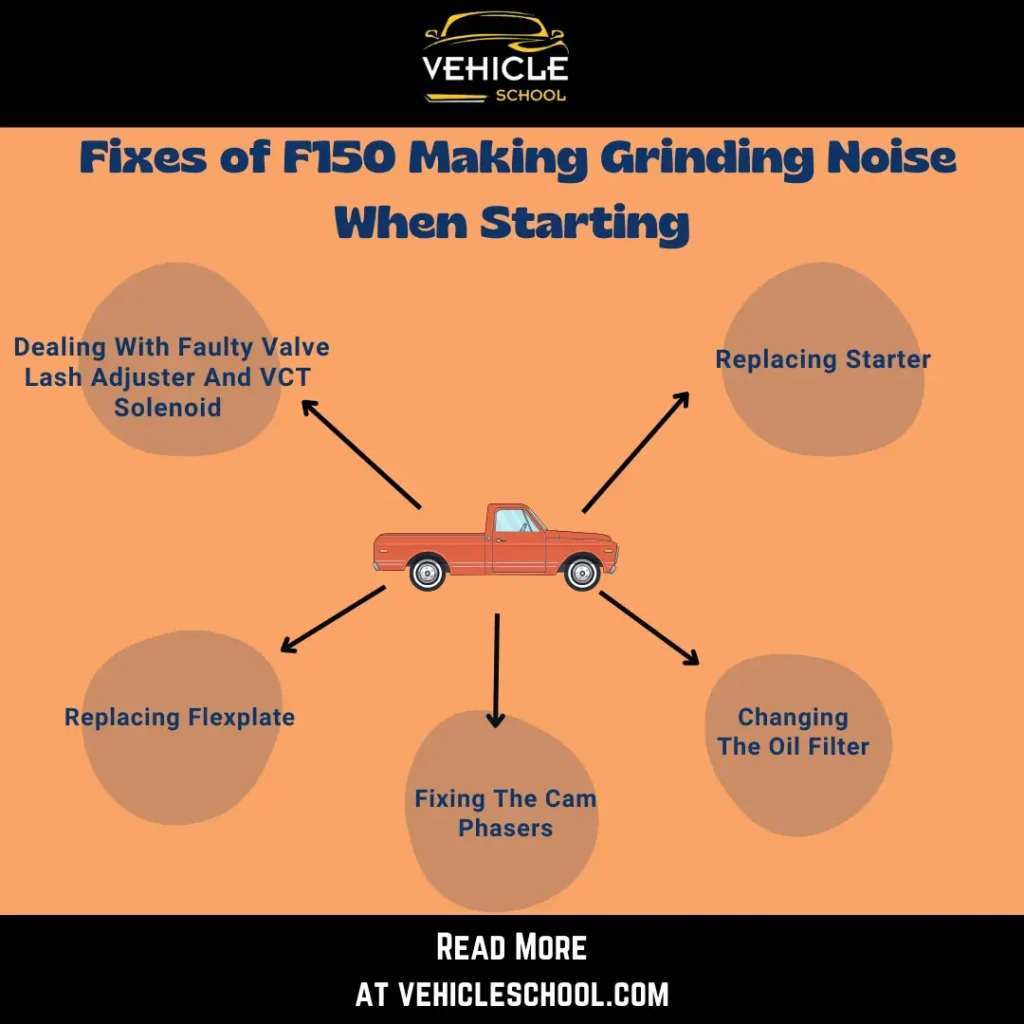
1. Dealing With Faulty Valve Lash Adjuster And VCT Solenoid
- Disconnect the battery to prevent electrical mishaps.
- Park on a level surface; engage the parking brake for stability.
- Rotate the cam to align with the egg-shaped lobes.
- Use a screwdriver to lift and detach the lash adjuster.
- Remove with pliers; insert a primed new one.
- Place the roller back under the cam.
- Press down on the spring; lock the adjuster in place.
- Locate the VCT solenoid near the oil fill.
- Remove the solenoid plug.
- Use a screwdriver and hammer to break the seal.
- Carefully pull out and unscrew the solenoid.
- Replace with a new solenoid; insert carefully.
- Hand-tighten the screw; secure the solenoid.
- Start the engine to check for any startup noises.
| Tip: Choose Purolator or Motorcraft oil filters for a quieter startup. Their built-in check valve or anti-siphon valve prevents oil drainage during shutdown, reducing the chances of annoying grinding noises when you kick off your engine. |
2. Replacing Starter
- Check starter compatibility with cluster and PAT system.
- Turn off and disconnect the negative battery terminal.
- Remove power wires from the old starter.
- Loosen and remove old starter bolts.
- Clean engine’s mating surface.
- Apply anti-seize to new starter bolts.
- Install and tighten new starter bolts.
- Reconnect power wires to new starter.
- Use 1/4″ ratchet for initial tightening, 3/8″ for final.
- Reattach protective cover on starter solenoid.
- Apply grease to starter shaft for smooth operation.
- Turn on ignition, start vehicle, check engagement.
- Monitor startup for any recurring grinding noises.
3. Changing The Oil Filter
- Find the oil filter; it’s usually on the side or underneath the engine.
- Use your hand or an oil filter wrench to remove the old filter. Be ready for some oil spillage.
- Make sure to drain the rest of the old oil.
- Wipe the surface where the oil filter attaches to the engine to ensure it’s clean.
- Apply a bit of oil to the rubber gasket on the new filter.
- Screw it on hand-tight without too much force.
- Pour in the right amount and type of oil specified for your vehicle.
- Start the engine, run it for a few minutes, and check for leaks around the oil filter.
- Turn off the engine, wait a minute, and check the oil level using the dipstick. Top up if needed.
- Dispose of the old oil and filter.
4. Replacing Flexplate
This one is among the longer fixes, so make sure you have several hours of free time:
- Park on a flat surface; disconnect the battery.
- Use a jack to raise the front; support with stands.
- Disconnect and support the transmission per the truck’s manual.
- Use an 18-mm socket to steady and remove flexplate bolts.
- Keep the upper bolt, remove the rest, and pull the flexplate.
- Inspect the new flexplate; ensure it matches the old one.
- Clean and inspect the crankshaft’s mounting surface.
- Position the new flexplate and secure it with bolts evenly.
- Reinstall components like the starter.
- Reconnect the transmission; lower the vehicle.
- Reconnect the battery, start the truck, and listen for odd noises.
5. Fixing The Cam Phasers
If you’re under warranty, you can still DIY a replacement without voiding anything.
There’s an easy method to swap out cam phasers without needing to remove any chains, tensioners, or guides.
- Get the EcoBoost-compatible cam holding tool and a wedge tool.
- Turn the camshafts so they’re not aligned with the cam holding tool.
- Secure the cams with the cam holding tool.
- Insert the wedge tool between the chain guides.
- Mark cam positions with a paint pen for reassembly.
- Take off the old phasers by removing the bolts.
- Replace with updated cam phasers.
- Confirm the timing marks on the cams match the marked positions.
- Secure new phasers in place by tightening bolts.
- Ensure cams align with timing marks.
- Take out the wedge tool, leaving the bottom components in place.
- Reinstall the removed parts and ensure everything is secure.
- Start the engine, listening for any unusual noises.
- Check the VCT unit locking pin for wear to ensure it’s locking correctly.
- If issues persist, swap out all four VCT units (cam phasers) with the latest design for a more effective fix.
This issue is very complicated, though. If you’ve still got grinding noises, you might need to do a full-timing set replacement.
That means replacing the primary and secondary timing chains, exhaust and intake phasers, main timing chain tensioners, and all related gaskets, o-rings, and seals.
I recommend doing this with a visual guide, and the process is too long to put in here anyway. You can follow along with this video from FordTechMakuloco:
Just be sure to do deeper research before you try it.
FAQs
How do you jumpstart a F150 starter?
To jumpstart your F150 starter, connect positive and negative jumper cables to the solenoid. Then, use a screwdriver with an insulated handle to jump between the power terminal and the “S terminal.”
Final Thoughts
Remember, your F150 might be a bit vocal at times, but a little TLC goes a long way.
If the noise persists, don’t hesitate to have a chat with your local mechanic – they know what to do if your truck needs deeper fixes to silence those quirks!


